Standard DVR and Whole-Home DVR

Generic filters
Exact matches only

Standard DVR and Whole-Home DVR

A DVR (Digital-Video-Recorder) is a set-top box with a built-in hard drive for recording and playback of television shows and movies. Whole-Home DVR is a service that allows you to watch those television shows and movies—from any TV in your home.

With Whole-Home DVR, you can start watching a recording in one room, then pause it and continue watching it in another room later. You can also schedule and manage your recordings from any set-top box in your home. If you have Whole-Home DVR, you will have to schedule recordings from the main DVR in your home.

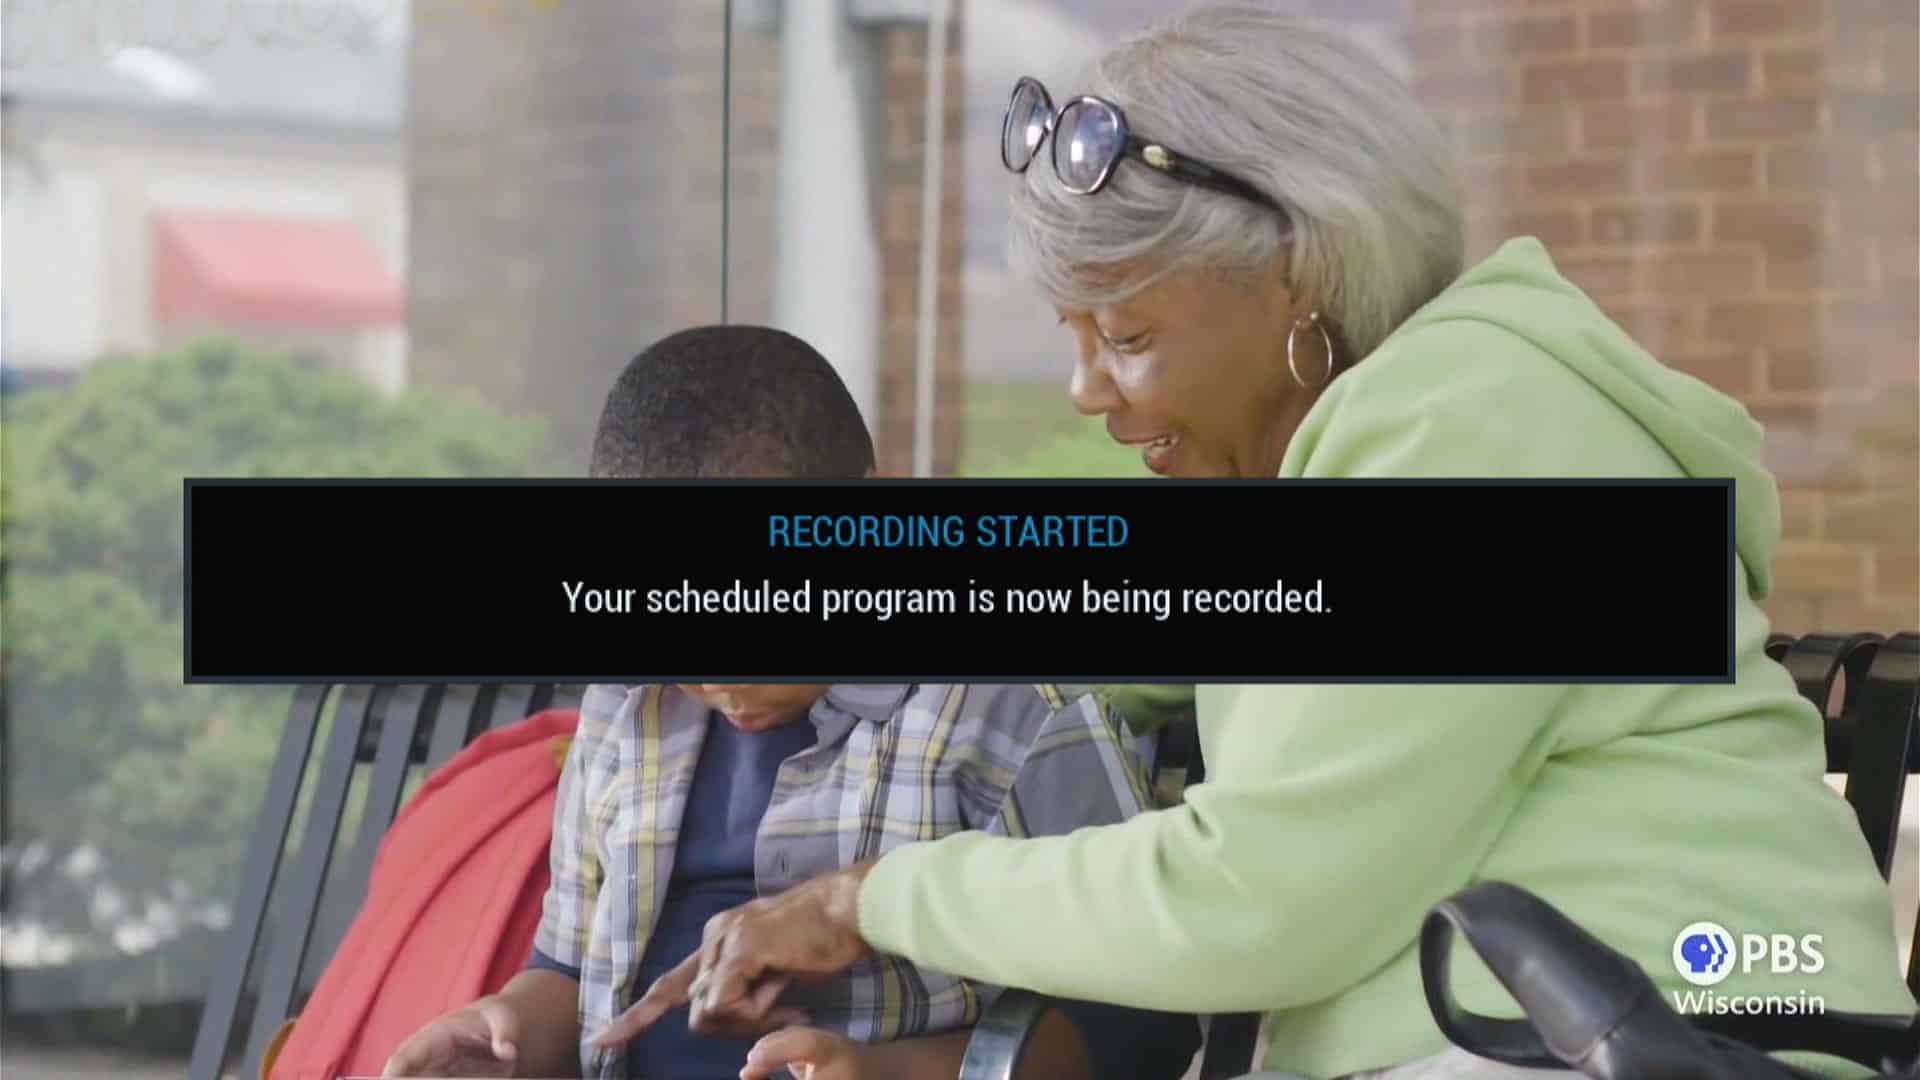
When you record a program, a red indicator light will appear on your set-top box to let you know your program is recording. Both the DVR and WHDVR set-top boxes allow you to record up to two shows at the same time.

Recording Content

  • Press the REC button on your remote any time while watching TV for easy one-touch recording.
  • Access the DVR Menu from DVR on the Quick Menu or Main Menu. From here, select My Recordings to view your list of recordings.

To record the remainder of a show you are currently watching:

  1. Press the REC button on your remote.

To record an upcoming show:

  1. Press the GUIDE button on your remote.
  2. Use the Arrow Keys to select a show airing in the future.
  3. Press the REC button on your remote.

To record multiple episodes of a series (series recording):

  1. Press the GUIDE button on your remote.
  2. Use the Arrow Keys to select an episode.
  3. Press the REC button twice on your remote.

  • Series recordings are automatically grouped into Folders so you can quickly scroll through your list of programs.

Watching Recorded Content

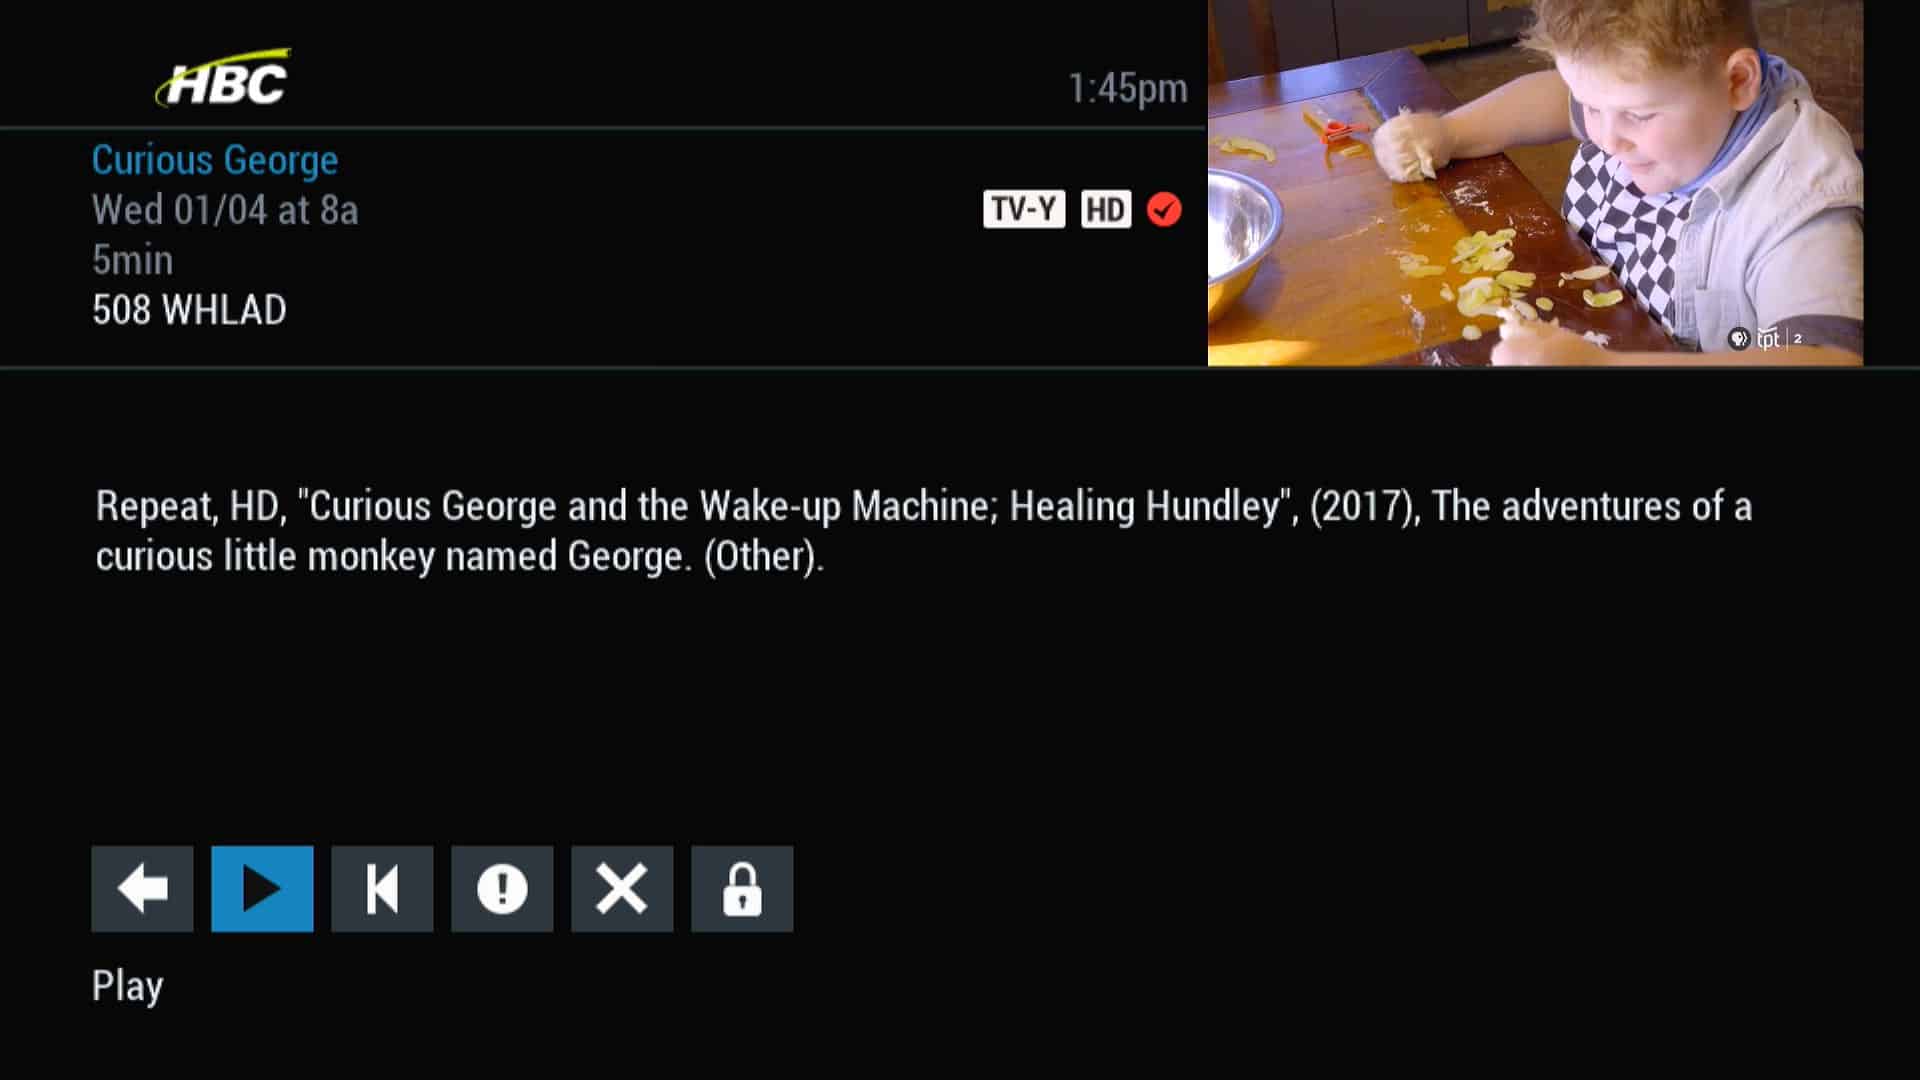
To playback a recording:

  1. Press the MENU button on your remote.
  2. Select the DVR icon from the Quick Menu.
  3. Select My Recordings.
  4. Select the program you want to watch, press the OK/SEL button on your remote, and then select the Play icon.
  5. Use the REW <<, FF >>, PAUSE II, PLAY >, and STOP buttons on your remote to control playback.

Searching for Content

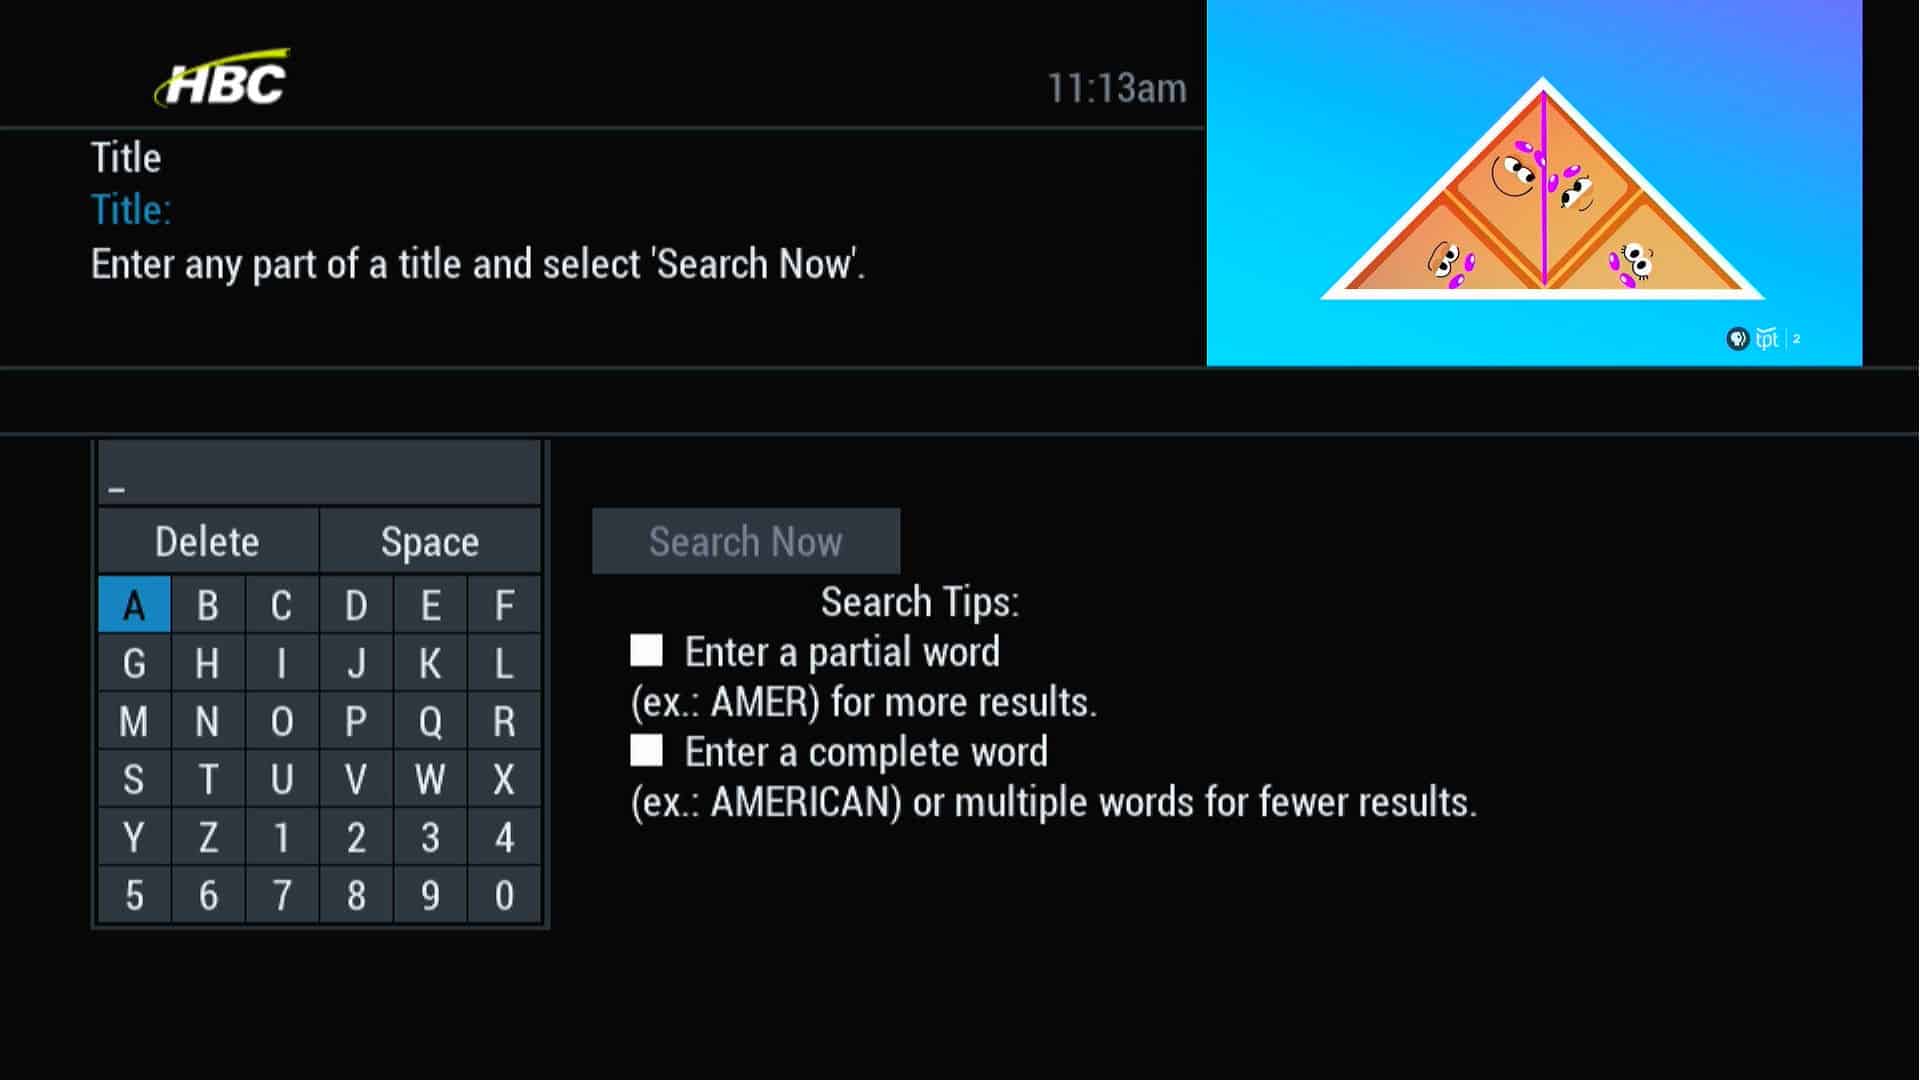
To search for a program or series:

  1. Press the MENU button on your remote.
  2. Select Search.
  3. Select your search category or if searching by Title, Keyword, or Actor/Director, use the on-screen keyboard to enter your search criteria.

Storage Settings

To adjust storage settings for a particular recorded program:

  1. Press the MENU button on your remote.
  2. Select the DVR icon from the Quick Menu.
  3. Select My Recordings.
  4. Select the recording you want to keep and press the OK/SEL button on your remote.
  5. Choose to save the recording until Space is needed or I delete.

Canceling and Deleting Content

  • DVR Cleanup lets you delete multiple shows at once, while DVR History keeps track of shows that were deleted.

To cancel a scheduled program or series recording:

  1. Press the MENU button on your remote.
  2. Select the DVR icon from the Quick Menu.
  3. Select Future Recordings.
  4. Select the program you want to delete and press the OK/SEL button on your remote.
  5. Select Set or cancel a recording.
  6. Select Don’t Record to delete the scheduled recording.
    -Once you cancel a program or series recording, the program or series will no longer record. To reschedule a program or series recording, follow the steps in the “Record a program or series” section.

To delete a single program:

  1. Press the MENU button on your remote.
  2. Select the DVR icon from the Quick Menu.
  3. Select My Recordings.
  4. Select the program you want to delete and press the OK/SEL button on your remote.
  5. Select Delete Recording.
    -Once you delete a program, you cannot undo this action.

To delete multiple programs:

  1. Press the MENU button on your remote.
  2. Select the DVR icon from the Quick Menu.
  3. Select DVR Cleanup.
  4. Select the programs you want to delete and press the OK/SEL button on your remote.
  5. Select Delete Recording.
    -Once you delete a program, you cannot undo this action.

View Future Scheduled Recordings

To view upcoming recordings:

  1. Press the MENU button on your remote.
  2. Select the DVR icon from the Quick Menu.
  3. Select Future Recordings.

Standard DVR and Whole-Home FAQs:

For DVR service, you will need a DVR-capable set-top box.

For Whole-Home DVR service, you will need at least one DVR set-top box, as well as one HD set-top box for each TV where you will watch your recordings. Please call your local office for more details about which set-top boxes are required.

Yes; you can record up to two different shows at the same time. You can also play back a previous recording while recording new episodes.

Yes; as long as you started watching the show from the beginning. You must, within the first half hour of the show, press the REC button and the recording will begin at the beginning of the show. If you change the channel before you press record and then change back, the show will no longer be able to record from the beginning.

Yes; with Whole-Home DVR service. Additional set-top boxes may be required.

Yes; DVR and WHDVR service also include Pause Live TV (PLT).

You can record and store approximately 70 hours of HD programming and 140 hours of SD programming.

You can keep the recordings as long as you like. When the hard drive gets full, by default, the DVR will delete your oldest recording to make room. To change this setting, see the “Storage Settings” section above.

Go into the My Recordings screen in the DVR menu. The percentage of space used is shown above the list of your recordings.

For additional help or support contact Wizards Technical Support at (877) 457-9669.

Was this article helpful?
Print Friendly, PDF & Email

Related Articles

Billing Support
SmartHub Account Creation
SmartHub Online Bill Pay
SmartHub Paperless Billing
SmartHub Pay by Phone
SmartHub Pay Now
General Support
Channel Lineup By Location
General Information and Billing Handbook
General Installation & Drop FAQ
Internet Handbook
Phone Handbook
Residential Wire Maintenance Plan
Seasonal Billing Program
TV Handbook
Internet Support
Bark
Talking to your kids about Bark
Email
Email Settings for Email Clients
Email Through Web Browser
HBC EdgeWave™ Spam Filter
iPhone® Settings for HBC Email
Mac Email Settings
Outlook Email Settings
Thunderbird Email Settings
GigaHome Blast (WiFi 6) Routers
GigaHome Blast u4 Setup
GigaHome Blast u6 Setup
Mesh Setup for GigaHome Blast u4
Mesh Setup for GigaHome Blast u6
GigaHome Gateway Router
GigaHome Gateway Settings
Mesh Setup
HBC GigaHome App
HBC GigaHome App Consumer Guide
HBC GigaHome App Features and Benefits
HBC GigaHome App Installation
HBC GigaHome App Support Videos
Streaming
Location Errors with Live TV Streaming
Streaming Devices Support
Streaming Services Support
WiFi Hotspots
WiFi Hotspots Guidelines
WiFi Hotspots Support
Internet FAQs
Phone Support
Phone Feature Instructions
Call Management Portal Instructions
Call Management Portal Support Videos
MaX UC Desktop Instructions
MaX UC Mobile Instructions
Virtual Phone
Voice Summit
Voicemail & VM2-GO
Call Completion FAQ
Caribbean & NANP Zone 1 Calling Rates
HPBX Security Notice
International Calling Rates
PBX Voicemail Security Notice
Persons With Disabilities
Policies Support
Consumer Labels for Broadband Services
Broadband Facts Fiber 200 Mbps
Broadband Facts Fiber 500 Mbps
Broadband Facts Fiber 1 Gigabit
Broadband Facts Fiber 2 Gigabits
Broadband Facts Fiber 5 Gigabits
Broadband Facts Standard 200 Mbps
Broadband Facts Standard 500 Mbps
Broadband Facts Standard 1 Gigabit
Broadband Facts Air 25 Mbps
Broadband Facts Air 50 Mbps
Broadband Facts Air 100 Mbps
Broadband Facts Air Max 30 Mbps
Broadband Facts Air Max 50 Mbps
Policies & Procedures
Broadband Internet Service Disclosure
Cable Subscriber Privacy Notice
Caller ID Spoofing
Commercial Acceptable Use Policy and Customer Agreement
CPNI Opt Out Information
CPNI Privacy Information
DMCA (Digital Millennium Copyright Act) Counter Claim
DMCA (Digital Millennium Copyright Act) Policy
E911 Battery Backup Policy
E911 Service
FCC Emergency Alert System (EAS) Mandatory Accessibility Notice
Identity Theft Notice
Internet Acceptable Use Policy
MN Relay Annual Customer Notice
National Do Not Call Registry
Rented Equipment Acknowledgment
Residential Acceptable Use Policy and Customer Agreement
Telephone Assistance Plan & Federal Lifeline Program
Toll Fraud Policy
Public Information
711 for Telecommunications Relay Service
Accessibility to Emergency Information on Television
Internet Protocol (IP) Relay Service
Minnesota Relay
Minnesota Telephone Discounts Brochure
Public Service Announcements
Telecommunications Relay Service—TRS
Video Relay Service—VRS
Voicemail System Hacking
VoIP and 911 Service
TV Support
Channel Lineups
Altura Channel Lineup
Cannon Falls Channel Lineup
Castle Rock, Empire, Miesville, New Trier, and Nininger Township Channel Lineup
Chatfield Channel Lineup
Dover Channel Lineup
Eyota Channel Lineup
Farmington Channel Lineup
Kellogg Channel Lineup
Lake City Channel Lineup
Lewiston Channel Lineup
Plainview & Elgin Channel Lineup
Red Wing, Wacouta, & Prairie Island Indian Community Channel Lineup
Rollingstone & Minneiska Channel Lineup
Rural Winona County Channel Lineup
St. Charles Standard Channel Lineup
St. Charles & Winona Channel Lineup
Stockton Channel Lineup
Utica Channel Lineup
Wabasha Channel Lineup
Winona Standard Channel Lineup
Expanded Business Essentials
Altura Expanded Business Essentials Channel Lineup
Cannon Falls, Castle Rock, Miesville, and New Trier Expanded Business Essentials Channel Lineup
Chatfield Expanded Business Essentials Channel Lineup
Dover Expanded Business Essentials Channel Lineup
Eyota Expanded Business Essentials Channel Lineup
Kellogg Expanded Business Essentials Channel Lineup
Lake City Expanded Business Essentials Channel Lineup
Lewiston Expanded Business Essentials Channel Lineup
Plainview & Elgin Expanded Business Essentials Channel Lineup
Red Wing Expanded Business Essentials Channel Lineup
Rollingstone & Minneiska Expanded Business Essentials Channel Lineup
Rural Winona County Expanded Business Essentials Channel Lineup
St. Charles Expanded Business Essentials Channel Lineup
Stockton Expanded Business Essentials Channel Lineup
Utica Expanded Business Essentials Channel Lineup
Wabasha Expanded Business Essentials Channel Lineup
Winona Expanded Business Essentials Channel Lineup
Winona Standard Expanded Business Essentials Channel Lineup
Bulk Channel Lineup
Bulk Channel Lineup—Red Wing
Bulk Channel Lineup—SMU/WSU Winona
Bulk Channel Lineup—St. Charles and Winona
Bulk Channel Lineup—Wabasha
GigaWorld Essentials Plus
GigaWorld Essentials Plus Channel Lineup – Altura, Lewiston, and Stockton, MN
GigaWorld Essentials Plus Channel Lineup – Cedar Valley, East Burns Valley, Elba, Minneiska, Ridgeway, Rollingstone, St. Charles, Utica, Wilson, Winona, and Witoka, MN
GigaWorld Essentials Plus Channel Lineup – Cannon Falls, Miesville, and New Trier, MN
GigaWorld Essentials Plus Channel Lineup – Dover and Eyota, MN
GigaWorld Essentials Plus Channel Lineup – Elgin, Kellogg, Plainview, and Wabasha, MN
GigaWorld Essentials Plus Channel Lineup – Lake City, MN
GigaWorld Essentials Plus Channel Lineup – Red Wing and Wacouta, MN
Channel Lineup By Location
DVR and Whole-Home DVR
Luminet Whole-Home DVR
Standard DVR and Whole-Home DVR
HBC+ Video App
HBC+ Video App Installation & Quickstart Guide
HBC+ Video Upgrade FAQs
Parental Controls
Luminet Parental Controls Instructions
Standard Parental Controls
Remotes
Luminet Service Remotes
Amino Willow Remote
CLIKR-5 Remote
Palamino4 Remote
PHAZR-5 Remote
Pontis Remote
Titan Remote
Universal Easy Clicker Remote
Standard Service Remotes
ARRIS MP2000 Universal Remote
CLIKR-5 Remote
Evolution HD-uDTA Remote
Experience Netflix Remote
Motorola DTA100 Remote
Motorola HD—uDTA Remote
PHAZR-5 Remote
Pontis Remote
Universal DTA Remote
Universal Easy Clicker Remote
Set-Top Box Instructions
DTA Set-Top Box Instructions
Evolution HD DTA Set-Top-Box Instructions
Motorola DTA 100 Set-Top-Box Instructions
Motorola HD DTA Set-Top-Box Instructions
Streaming
Location Errors with Live TV Streaming
Streaming Devices Support
Streaming Services Support
TV2-Go
TV2-Go Instructions
Channel Lineup By Location

Title